Rendering
The rendering tab contains basic settings that control the size and quality of the rendered image.
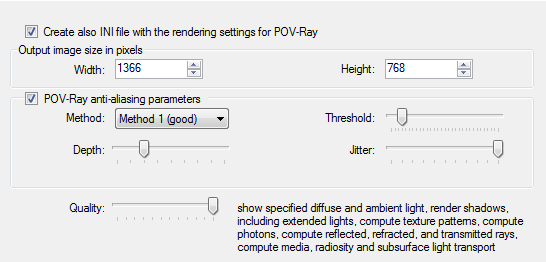
Create also INI file with rendering settings for POV-Ray - when this check box is checked, LDD to POV-Ray™ Converter generates a special INI file for the POV-Ray™. This file contains parameters from this tab and also reference to generated POV file contains model scene. It is enough to open the generated INI file in the POV-Ray™ and click the Run button on the toolbar to start the rendering.
Width and Height of the output image in pixels - these two fields contain desired width and height of the output image in pixels. By default they are width and height of the current screen resolution. It is recommended to enter values that have the same aspect ratio as the screen resolution otherwise the visible portion of the model will be different from the portion visible in the LDD.
POV-Ray anti-aliasing parameters - checking this check box activates anti-aliasing algorithm of the POV-Ray™.
Note: POV-Ray's anti-aliasing has sometimes problem with the transparent parts and output image may contain some unwanted artifacts on these parts. In such case it is better to turn off the anti-aliasing, render at higher resolution (at least double of the desired final width and height) and resize down the output image using a tool which supports resizing with bicubic resampling.
Method - POV-Ray™ supports two anti-aliasing methods. For most of the cases the first method is sufficient. When results using first method are not satisfactory, second method may help, but rendering with this anti-aliasing method takes longer.
Threshold - this value directly controls sensitivity of the anti-aliasing. It represents maximum allowed difference of a color of a pixel when compared with neighbouring pixels. When difference is more than this value, pixel will be anti-aliased. Lower values produce better results, but require longer time to render, because more pixels have to be anti-aliased.
Depth - during anti-aliasing the pixel is super-sampled by shooting additional rays. This parameter controls how many additional rays should be used. When using method 1, the number of additional rays is a square of the depth (for example: when depth is 3, number of additional rays is 9, when 4, then it is 16). In case of method 2 the number of rays is even higher, because it is recursive method (for example: when depth is 3, number of additional rays is 81, when 4, then it is 289).
Jitter - when enabled it generates random noise to reduce regular aliased patterns appearing in the output picture.
Quality - this directly controls quality of the output image. POV-Ray™ has 11 quality levels - some of them produce the same image since they are reserved for future use. The higher quality takes longer to render so it is recommended to use low quality for the preview image and higher quality for the final output.