Lights and shadows
The lights tab contains the settings for the lights and shadows.
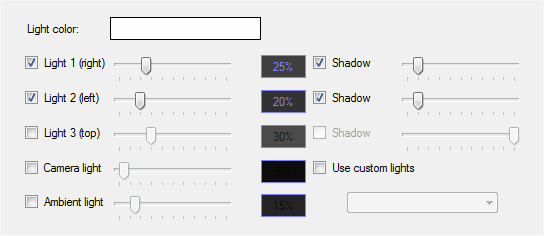
Lights
The LDD to POV-Ray™ Converter supports 3 real light sources plus ambient and camera light setup. Ambient light is in POV-Ray™ simulated by adding specified amount of light to every object in the scene. Even to those objects which are not directly illuminated by any real light source. Camera light is actually a real shadowless light source located in the same location as camera and pointing in the same direction as camera. It is very similar to the light mounted directly to a real camera.
To specify lighting conditions:
- select the color of the lights by click the color rectangle. Select slightly bluish color to get fluorescent light appearance or slightly yellowish color to get traditional light bulb or sunny day appearance.
- check the check boxes of the desired light sources and specify their intensity by dragging the slider. The more light sources you will add the longer will take the scene rendering.
Note: more ambient light will make scene brighter, but it will loose details, since ambient light does not honor the surface properties, edges, curves etc. 100% ambient light with disabled other light sources will make scene flat colored which is suitable mostly for the building guide generating purposes in combination with the outlines.
Shadows
For each of the light sources there is a posibility to enable or disable shadows cast by the light source. Shadows and highlights are closely related together in POV-Ray™ so shadowless does not generate highlights on the objects in the scene.
To enable shadow:
- check the "shadow" check box next to the light source.
- specify the shadow softness by dragging the slider. Left most position generates hard shadows. That kind of shadows is suitable for rendering space scene (like spaceships in open space or astronauts on some planet). Rightmost position generates very soft shadows. That kind of shadows is usually only in closed areas with many light sources. Use second or third position from the left to obtain shadows similar to the ones seen during sunny days.
Note: the more shadows you will add, the longer will take the rendering of the scene. The leftmost position also renders faster because light source can be more simple when casting only hard shadows.
Very hard shadows (0% - leftmost position)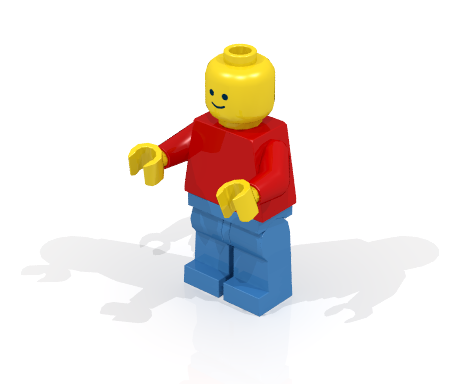
Very soft shadows (100% - right most position)
Realistic shadows (20% - 3rd position from left)
Realistic shadows (10% - 2nd position from left)
